Gold ring repair
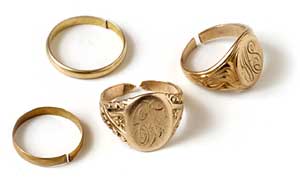
After four years of beach hunting, our ring collection had grown quite a bit. Unfortunately, many of the rings that we found, were broken in one way or another.We took some of the better pieces to a local jeweler and had him do the work, but the "do it yourself" person that I am, I decided to learn these techniques on my own.
Disclaimer:
These repair techniques
we're about to describe have worked for us, but we're not going to guarantee it will work for you. Certain precautions and care should be taken, and we cannot be held responsible for any damage that may occur on your side. You're doing this at your own risk.
 It wasn't as easy as I thought it was going to be. I screwed up on my first few tries. But by being more careful and not being in such a hurry, I'm getting the hang of it now.
The tools I used are pretty basic, and what I had handy at the time. My plan was to do the job without "breaking the bank."
Supplies are available online, and very affordable.This technique will work for basic repairs for rings without stones.
So let me begin by describing the tools your going to need.
Tools you will need
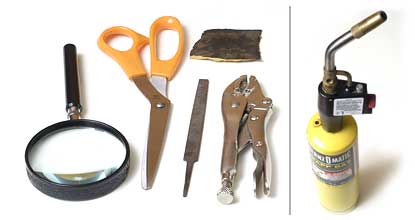 A "Mapp Gas" acetylene torch can be found at Home Depot for about $30.00
You could also try a propane torch, or if you're really serious about this, you could get a propane oxygen torch, but those will get quite pricey.
Vise grips or channel locks to hold your ring in place. You may already have those kicking around in your garage, or you can purchase them at Home Depot for a couple bucks.
Scissors, for cutting a little piece from the solder sheet.
A small, "fine" file and real "fine" sandpaper.
Magnifying glass
A toothpick
Optional: a buffing wheel to shine it all up.
Supplies
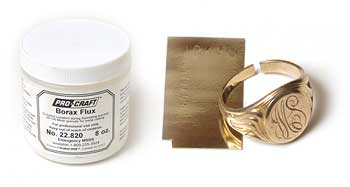 Gold solder, there are many different types and varieties but I am going to use a sheet of 10k yellow gold medium solder. Depending on the ring you're going to repair, you may have to order the appropriate color and karat.
NOTE: It's very important not to use the same "karat" solder as your ring. Always go lower in karat for the solder.
For example, if your ring is 14k then use 10k solder. This insures that your ring won't melt before your solder. I have purchased a medium 10k sheet of solder weighing 1dwt. for approximately $20.00 This would be enough to do hundreds of repairs.
Liquid Flux is used so your solder will adhere to your ring.
Get your solder and flux supplies at PJ Supply.
Preparing
 One of the important things to achieve a quality "joint" between the two broken ends, is by spending more time "preparing" before you solder it.
Start by removing the old solder, if it still remains, with a small file and sandpaper. A half round file could come in handy for cleaning the inside of the band.
Now insert the file between the two ends, and move it back and forth several times to get rid of the rough edges. If you want to "down size" it to fit you better, then remove enough of the material, till it fits your finger perfect. Upsizing is a different animal and we're not going to cover it here.
If your ring is slightly "out of round" don't worry, we'll fix that when we're done soldering.
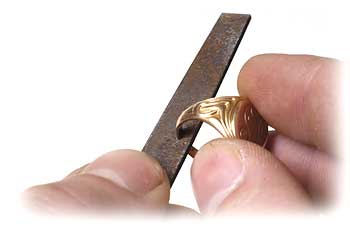
Fine Tuning
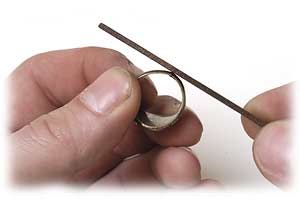
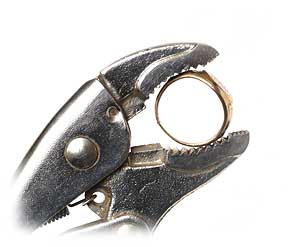 Now secure your ring in the vise grips so that the broken ends are "closed" together, and observe the joint through a magnifying glass. You may want to file the inside of your vise grips a little bit to make them smoother, so they won't scratch the outside of the ring.
In this picture I have the shank of the ring facing inside the vise grips, but when we solder it, I will turn the shank to face outward. It should be tight all the way around, with no visible gaps or spaces.
Keep filing it till you get there. It may take a few tries, but this is the key to success.
NOTE: If you have any stones in your ring, they must be removed unless you don't want them, because they most likely will crack or change color. Removing stones is beyond this tutorial, and we're not going to describe it here.
Gold Solder
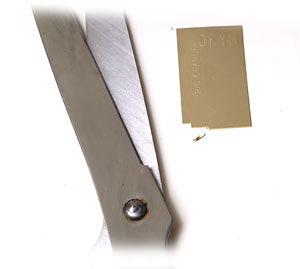 After your finished with the joint, cut a tiny piece of solder with your scissors, the smaller the better.
Don't cut anymore of a piece then what you need, or it will take you longer to file off the leftover solder.
You only need enough to fill in your joint which is really small. The one that I just cut off is enough to do two rings, but you can at least get the idea.
I wasn't kidding when I said 1dwt. is enough to do a hundred or even thousands of rings. So $20.00 is well worth it. It would cost you about $35.00 to go to a jeweler and get one repair done.
Close the joint
 Secure your ring in the vise grips, tight enough so the joint is tightly closed. But not so tight that you bend the ring.
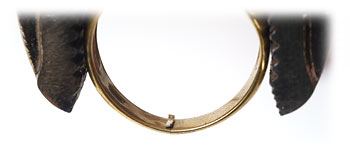
Put a tiny dab of liquid FLUX on the joint, and put the tiny gold solder on top. If you have powered flux, mix it with a dab of alcohol to form a paste.
To pick up the little piece of solder you just cut, wet a toothpick and it will stick to it, then lay it on top of the joint as pictured here.
Use a heavy glove or wrap a rag around the vise grip handles, as things are about to get hot.
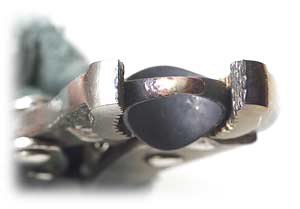
The second most important thing, is to melt the solder correctly. Fire up your torch and only use the tip of the flame from underneath your joint. Keep moving the flame around the shank at all times. When the solder melts it will be drawn into the joint, sealing the two ends together.
Let the fun begin
 It's very important not to overheat and melt your ring, so keep your flame far away at first and don't point it at the joint, or the solder directly.
Solder is attracted to heat, so your flame needs to pull the solder through the joint. So angle the flame from underneath the ring, not from the top.
I find it easier working in a darkened area so I can observe the color of the heated metal and the flame. When it starts getting red, I back off a little with the flame. You only want to melt the solder, and it's very easy to melt the ring. The smaller the shank of your ring, the more careful you have to be not to melt it.
So practice on some beat up undesirable rings first, and when you feel confident, move on to the better rings. After your solder has melted and everything looks good, let it "air cool" and inspect your work.
It should be a nice, tight, and strong joint. If you did it right it will last for years.
Finishing the joint
 Now its time to use your fine file and sandpaper to finish up the rough edges of the joint if you have to, to make it smooth inside and out. No need to rush here. Just take it easy and go slow. Use the file to shape it up and then use a fine sandpaper to get rid of the scratches.
To shine it all up, you can buff it on a buffing wheel.
Also a dremel tool would be handy for buffing the inside of the ring.
Make it round again
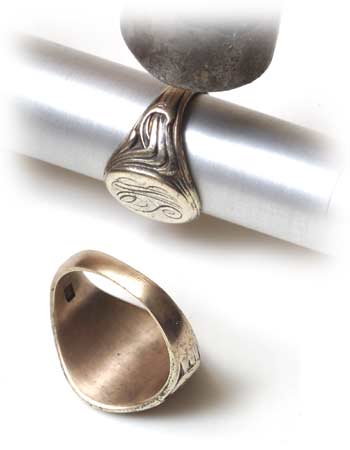 I have made a wooden dowel that is tapered, and will fit most ring sizes. Maple wood is ideal because it can take the beating, and will last a long time. But use what you have handy at the time.
I have also used an aluminum ring sizer which was the same shape, but it tends to scratch the rings on the inside.
Simply slip the ring on, and tap it with a small soft mallet until it's perfectly round. You may try to heat it up a little bit with the torch if it's a heavy ring. This will make the bending a lot easier.
Here's a closer view of the finished ring. Aren't you proud of yourself!
Now you can wear that old relic, sell it, or give it to your loved one.
I wish I would have learned this technique before I sold most of my broken jewelry as scrap.
I am by no means a professional jeweler or am trying to be one. I just wanted this done with simple tools. If you know of any better ways or some tips and ideas, feel free to share them with us.
Update
After buying proper tools it became much, much easier to repair my broken jewelry.Feedback from our readers
Hi, my name is Victor Montes, and I am a professional goldsmith. I have read your article in jewelry repair and I have to congratulate you on your achievement, the ring in the picture looks very well repaired. One thing I would like to mention on the information you are providing to your readers about the solder is this: when sizing a ring you need to use a higher karat on the solder, for the following reasons.14k yellow gold melts at 1615 Fahrenheits, 10k medium melts at 1260 F. way bellow the melting point of 14k gold but. The 14k hard solder melts at 1475 F. while 18k hard solder melts at 1440 less than 14k hard (all this is plumb solder cadmium free) by comparing the the melting temperatures between 14k and 18k solder you have a lower melting point by 35 degrees and you still have 175 degrees before your 14k ring starts to melt.
The other reason why you will want to use a higher karat is because the higher the karat the more difficult it will be to see the solder joint, it will oxidize less and it will not wear out as fast. I hope you take this advice in consideration next time you are doing some repairs [or writing about] in your rings. When I am doing repairs all I use is 18k solder in white and yellow gold in easy, medium, and hard with the exception of 14 white hard, I use this as if it was my "18k medium solder" because they do not make 18k medium for reasons unknown to me, but the melting point of 14k hard is in between the melting points of 18k easy and 18k hard.
You can contact Victor
Your Feedback is much appreciated, thank you Victor!
We went "extreme" and learned how to cast jewelry as well. It took us years to research this ancient craft and yes, we are going to share it with you in our next tutorial.
Also read about jewlry scales